
Road positioning
Position 1, 2 or 3: let the hazard make the call
15 October 2026
4 min readAsk ten riders where you should sit in your lane and you’ll probably get ten answers. Some of us were taught to ride in position 1 most of the time and only move out when turning at a junction. Others were taught to keep moving across the lane to get the best view. Neither answer is right for every road, every bend and every day.
That’s the point of this article. There’s no single correct position. What matters is how you decide, and that’s where the advanced riding guidance helps. It doesn’t set a fixed line. It gives you an order of priorities.
That decision matters most on left-handers. Research summarised in Transport Scotland’s PRIME road trials report found that where we ride on the left, left-hand bends are more dangerous for motorcyclists than right-hand bends.
The priorities
Safety, stability, then view
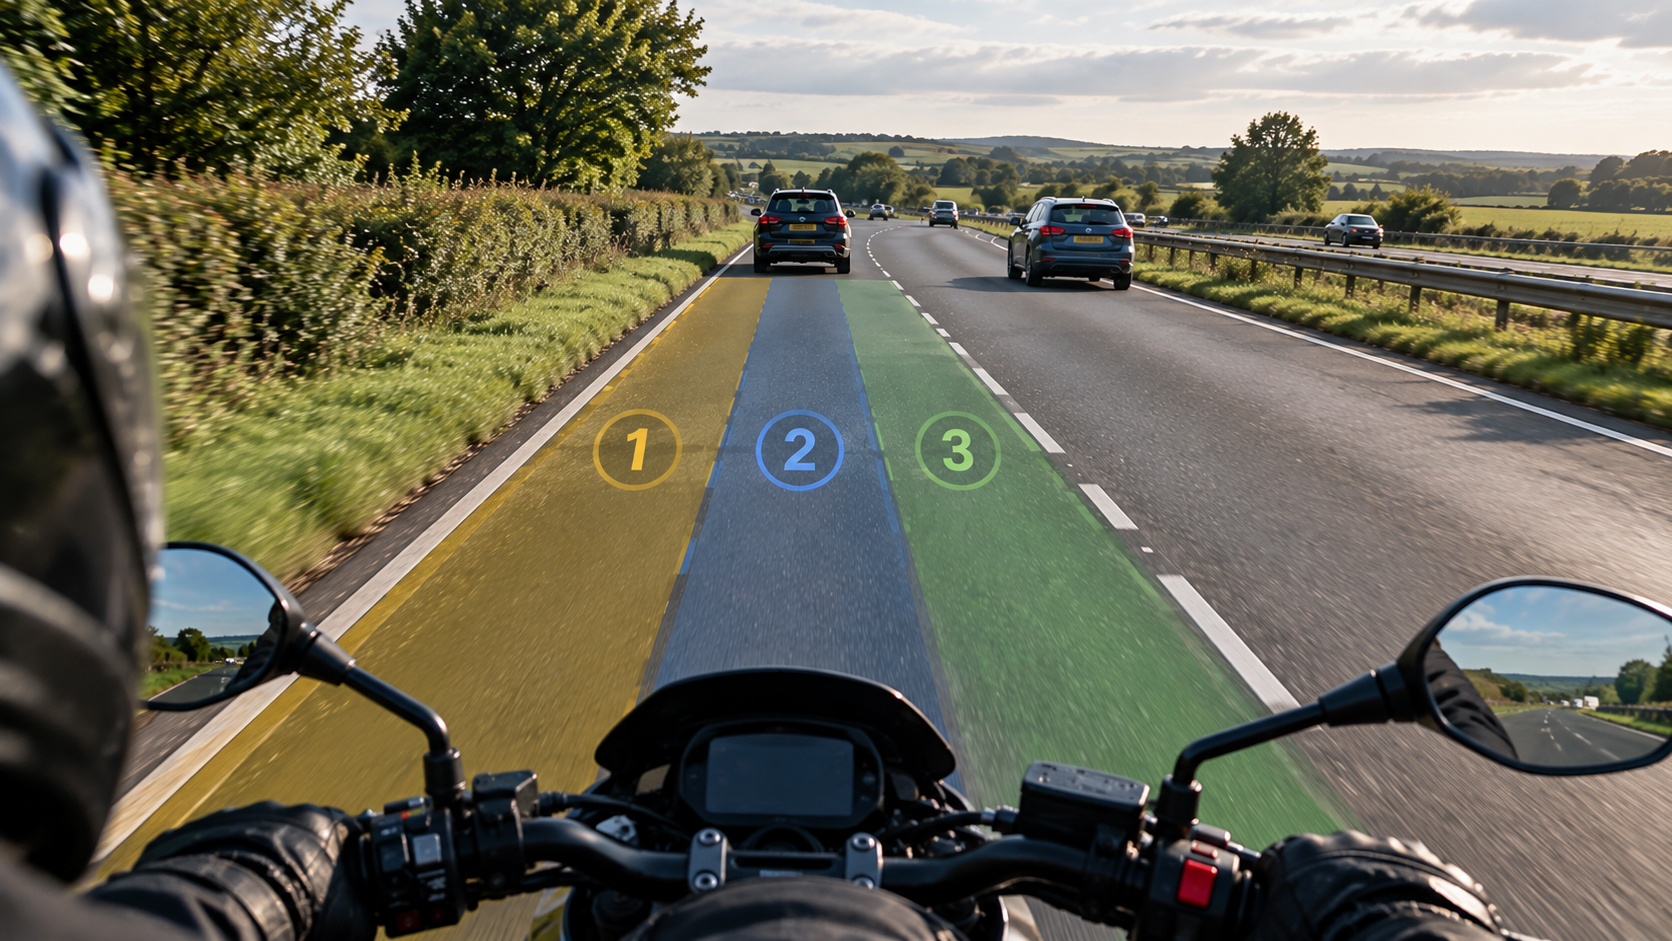
In this article we use the numbered positions common in advanced rider training: position 1 is towards the nearside (the verge or kerb), position 2 is the centre of the lane and position 3 is towards the centre line.
Motorcycle Roadcraft, the police rider’s handbook, sets out positioning as a list of priorities: safety, stability, then view. Is the position safe for you and others? Is the surface good and the bike stable? Only then: does it give you the best view?
The RoSPA RoADAR motorcycle test guidelines take the same line. Examiners look for “the best view with appropriate safety margins”, and the guidance is clear: “never sacrifice safety for view.”
So on a left-hand bend, a rider working to that guidance will often look at position 3 first, because moving towards the centre line opens up the view around the corner. But it’s only an option, and it has to pass the safety and stability checks first.
Safety
When cars cut the corner
For an oncoming driver, your left-hander is their right-hander. Plenty of drivers straighten out a right-hander by drifting over the centre line, especially on roads they drive every day.
If you know a particular bend is one where oncoming cars regularly cut across, position 3 puts you exactly where their mistake lands. That fails the first check. Position 2 gives up a little view but puts a buffer between you and the centre line.
Local knowledge matters here: the bend on your commute, the lane to the pub, the B-road everyone uses as a shortcut. If you’ve seen it happen there before, expect it to happen again.
Never sacrifice safety for view. RoSPA RoADAR motorcycle test guidelines
Stability
When the surface takes over
Now picture the same bend with a band of gravel down the middle of the lane. It might have washed out of a farm entrance or been thrown out by traffic cutting the corner. Either way, it’s sitting right where position 2 would put your tyres.
That fails the stability check. Position 1 becomes the better option, even though it gives you the least view of the three. You can make up for a shorter view. You can’t make up for a front tyre washing out on loose stones mid-bend.
View
Less view means less speed
Choosing a position with less view has a knock-on effect. The RoADAR guidelines put it simply: “You must always be able to stop on your own side of the road in the distance you can see to be clear.”
If you’ve moved to position 1 because of gravel, you can see less of the road around the bend, so you have to slow down to match.
Your position also doesn’t have to stay fixed for the whole bend. Once you’re past the gravel, or the oncoming car has gone by, you can move back out and open the view up again. Positioning is a decision you keep making all the way through the bend, not just once on the way in.
Your checklist
Before and through the bend
We all make positioning decisions on every bend, most of the time without even thinking about it. These are a few things worth keeping in mind next time we’re heading into a left-hander: what to do, what to avoid and what to think about.
Check any position against safety first, then stability, then view
Use local knowledge: remember the bends where oncoming traffic cuts across
Scan the surface on the way in for gravel, mud, diesel, leaves or broken tarmac
Slow down whenever the position you’ve chosen reduces your view
Keep adjusting through the bend as the hazards change
Don’t move towards the centre line for view when you know oncoming cars cross it there
Don’t ride over a loose surface just to keep the better view
Don’t assume a bend is the same as the last time you rode it
Think about what’s on the other side of the centre line, not just your side
Think about where debris collects: field entrances, farm tracks and the inside of tight bends after rain
Think about whether you could stop within the distance you can see from your chosen position
The One Split Second take
However you were taught to position, the question on every bend is the same: which position is safest here, today? The advanced riding guidance gives a clear order to answer it in. Safety first, then stability, then view.
Sometimes that means moving out for the view. Sometimes it means holding back from the centre line or tucking in to avoid a poor surface. What’s constant is the thinking behind it, and slowing down to match the view you’ve got.
Ride Safe.
View is useful. Safety and grip come first.
We want your rider stories to help others learn.
Drop us an email at: